文档:
https://docs.spring.io/spring-boot/docs/current/reference/html/
https://docs.spring.io/spring-boot/docs/current/reference/htmlsingle/
ch文档
https://www.springcloud.cc/spring-boot.html#boot-documentation-about
@Configuration(proxyBeanMethods = false) //告诉SpringBoot这是一个配置类 == 配置文件
proxyBeanMethods = false每次调用都申请新类
proxyBeanMethods = true只生成单例
@Component将此类将给spring容器进行管理
@restController = @ResponseBody + @Controller
@PathVariable、路径变量
@RequestHeader、获取请求头
@ModelAttribute、获取request域属性
@RequestParam、获取请求参数
@MatrixVariable、矩阵变量(配合@PathVariable变量使用,url后;的值)
@CookieValue、获取cookies指
@RequestBody、获取请求体
@RequestPart
@RequestPart这个注解用在multipart/form-data表单提交请求的方法上。- 支持的请求方法的方式
MultipartFile,属于Spring的MultipartResolver类。这个请求是通过http协议传输的
@RequestParam
@RequestParam支持’application/json’,也同样支持multipart/form-data请求
yml一些配置:
server:
  servlet:
    context-path:/word  # 已/world为项目前置路径
springboot默认行为
- 会自动检测resource下的application.properties和application.yml 然后自动加载
结构配置
结构:
com
 +- example
     +- myapplication
         +- MyApplication.java
         |
         +- customer
         |   +- Customer.java
         |   +- CustomerController.java
         |   +- CustomerService.java
         |   +- CustomerRepository.java
         |
         +- order
             +- Order.java
             +- OrderController.java
             +- OrderService.java
+- OrderRepository.java官方建议如上结构,@SpringBootApplication声明主类,默认情况下其下的包都会被自动识别
@SpringBootApplication 主文件配置类
- @SpringBootConfiguration:相当于@Configuration 代表所修饰类是配置类
@EnableAutoConfiguration
- @AutoConfigurationPackage 自动配置包
- @Import 导入某个类
- @ComponentScan:指定扫描位置
@Configuration 属性配置类:
属性配置功能@Configuration用来充当xml进行bean配置
@Import(User.calss)自动导入指定类的无参构造器,以bean形似存在于容器中@Condition*指定条件*下,所注释类或方法才生效@ImportResource("classpath:233.xml")导入xml- @EnableConfigurationProperties(car.calss)将指定类自动载入容器中(可以以这个类作为依据得知是否需要在Properties文件中对其进行配置)
- @ConfigurationProperties(prefix="car") 自动载入Properties文件重会的前缀
lombok
简化一些操作的包,在编译时自动生成一些东西
- @Data 自动生成属性配置类的get、set方法
- @ToString 自动生成toString方法
- @NoArgsConstructor 无参构造器
- @AllArgsConstructor 全参构造器
- @Slf4j 使用日志功能(修饰的类可以使用Log.info())
devtools
ctrl+F9触发idea的rebuild后,自动重载项目
自动配置访问静态资源
Spring Boot serves static content from a directory called /static (or /public or /resources or /META-INF/resources) in the classpath or from the root of the ServletContext
spring.mvc.static-path-pattern=/**来设置静态资源的前缀spring.web.resources.static-locations=[classpath:/]设置访问路径
spring启动时触发装配的类
- SpringBoot启动默认加载 xxxAutoConfiguration 类(自动配置类)
- SpringMVC功能的自动配置类 WebMvcAutoConfiguration,
关于webmvcconfigurer
我们可以使用@Configuration + WebMvcConfigurer接口来代替xml配置bean
@Configuration   //定义是spring的bean配置类
@ComponentScan("com.ex.test")  //扫描包
@Import(other.class)  //导入config
public class beanconfig{
    @Bean
    public User user(){return new User();}
}可以自定义一些Handler,Interceptor,ViewResolver,可以改变mvc的一些解析器,详情得查看WebMvcConfigurer接口中的方法
@Configuration   //定义是spring的bean配置类
public class Mymvcconfig implements WebMvcConfigurer{
    @Override
    public void addInterceptors(InterceptorRegistry registry) {
        registry.addInterceptor(new MyInterceptor()).addPathPatterns("/**").excludePathPatterns("/emp/toLogin","/emp/login","/js/**","/css/**","/images/**");
    }
HttpMessageConverters
https://www.1024sky.cn/blog/article/69
通过HttpMessageConverters 可以使用xml,json或其它形式进行“封送”和“解收”(marshall and unmarshall )java对象。
它是通过从请求的Accept头中获取信息,从HttpMessageConverter的列表中,取得相应的Converter对象,将java对象进行“封送marshall”成为xml或json。(前提是使用了@ResponseBody或@RestController)
它又可以通过从请求中获取Content-Type头信息,从从HttpMessageConverter的列表中,取得相应的Converter对象,将请求体进行“解收unmarshall”,从而转化成为java对象(前提是使用了@RequestBody对参数进行了注解)。
关于请求参数和请求域中设置
 @GetMapping("/params")
    public String testParam(Map<String,Object> map,
                            Model model,
                            HttpServletRequest request,
                            HttpServletResponse response){
        map.put("hello","world666");
        model.addAttribute("world","hello666");
        request.setAttribute("message","HelloWorld");

        Cookie cookie = new Cookie("c1","v1");
        response.addCookie(cookie);
        return "forward:/success";
    }
Map<String,Object> map, Model model, HttpServletRequest request 都是可以给request域中放数据,
在转发的/success中,使用request.getAttribute();都可以取出上面设置的值
自定义Converter功能
Converter是用来转化所接收到的参数(比如接收到一堆json数据 然后转化为person类)
可以自己定义输入的格式,以及最后输出所匹配的类型
通过使用WebMvcConfigurer.addFormatters中的registry.addConverter方法,新建一个Converter
@Override
            public void addFormatters(FormatterRegistry registry) {
                registry.addConverter(new Converter<String, Pet>() {

                    @Override
                    public Pet convert(String source) {
                        // 啊猫,3
                        if(!StringUtils.isEmpty(source)){
                            Pet pet = new Pet();
                            String[] split = source.split(",");
                            pet.setName(split[0]);
                            pet.setAge(Integer.parseInt(split[1]));
                            return pet;
                        }
                        return null;
                    }
                });
            }
关于响应参数(内容协商)
SpringMVC会根据发送请求头中的Accept字段来定义返回的类型
json,xml:
starter-web中已经自动设置
浏览器参数方式内容协商功能
spring:
    contentnegotiation:
      favor-parameter: true  #开启请求参数内容协商模式
发请求: http://localhost:8080/test/person?format=json 回复json格式
http://localhost:8080/test/person?format=xml 回复xml格式
MessageConverter
用来匹配后端返回给浏览器的转换类型(比如person转json)
根据请求头的中accept中的接受类型来转换向浏览器发送的数据类型,这个方法就是转换类型用的
实现多协议数据兼容。json、xml、x-guigu[自定义类型]
0、@ResponseBody 响应数据出去 调用 RequestResponseBodyMethodProcessor 处理
1、Processor 处理方法返回值。通过 MessageConverter 处理
2、所有 MessageConverter 合起来可以支持各种媒体类型数据的操作(读、写)
3、内容协商找到最终的 messageConverter;
自定义MessageConverter
在webmvcconfigurer.extendMessageCoverters功能
@Override
public void extendMessageConverters(List<HttpMessageConverter<?>> converters) {
    // GuiguMessageConverters 是自定义类
    converters.add(new GuiguMessageConverter());
}
需要自定义的Converter
/**
 * 自定义的Converter
 */
public class GuiguMessageConverter implements HttpMessageConverter<Person> {

    @Override
    public boolean canRead(Class<?> clazz, MediaType mediaType) {
        return false;
    }

    @Override
    public boolean canWrite(Class<?> clazz, MediaType mediaType) {
        return clazz.isAssignableFrom(Person.class);
    }

    /**
     * 服务器要统计所有MessageConverter都能写出哪些内容类型
     *
     * application/x-guigu
     * @return
     */
    @Override
    public List<Med iaType> getSupportedMediaTypes() {
        return MediaType.parseMediaTypes("application/x-guigu");
    }

    @Override
    public Person read(Class<? extends Person> clazz, HttpInputMessage inputMessage) throws IOException, HttpMessageNotReadableException {
        return null;
    }

    @Override
    public void write(Person person, MediaType contentType, HttpOutputMessage outputMessage) throws IOException, HttpMessageNotWritableException {
        //自定义协议数据的写出
        String data = person.getUserName()+";"+person.getAge()+";"+person.getBirth();


        //写出去
        OutputStream body = outputMessage.getBody();
        body.write(data.getBytes());
    }
}自定义contentNegotiation功能
内容协商器,负责处理接收参数和决定返回给浏览器的参数类型
请求域处理在contentNegotiationManage内容协商策略管理器中处理,默认含有以下两种协商处理器:
- HeaderContentNegotiationStrategy 默认的处理器,里面包含多种
accept中设定的多种请求 - ParameterContentNegotiationStrategy 开启浏览器参数方式内容协商功能后,才启用的协商处理器,默认支持:接收xml返回返回application/xml给浏览器,接收json返回application/json给浏览器
可以使用ParameterContentNegotiationStrategy 自定义接收的数据类型,并且返回一种自定义类型(需要在MessageConverter设置)
(比如指定一种格式叫做“gg”,返回“application/x-guigu”类型)
        /**
             * 自定义内容协商策略
             * @param configurer
             */
            @Override
            public void configureContentNegotiation(ContentNegotiationConfigurer configurer) {
                //Map<String, MediaType> mediaTypes
                Map<String, MediaType> mediaTypes = new HashMap<>();
                mediaTypes.put("json",MediaType.APPLICATION_JSON);
                mediaTypes.put("xml",MediaType.APPLICATION_XML);
                mediaTypes.put("gg",MediaType.parseMediaType("application/x-guigu"));
                //指定支持解析哪些参数对应的哪些媒体类型
                ParameterContentNegotiationStrategy parameterStrategy = new ParameterContentNegotiationStrategy(mediaTypes);
//                parameterStrategy.setParameterName("ff");

                HeaderContentNegotiationStrategy headeStrategy = new HeaderContentNegotiationStrategy();

                //加入parameterStrategy,headeStrategy两个解析器
                configurer.strategies(Arrays.asList(parameterStrategy,headeStrategy));
            }
拦截器
在实现了接口WebMvcConfigurer的类中,重写方法addInterceptors
// `WebMvcConfigurer`中的设置
@Configuration
public class AdminWebConfig implements WebMvcConfigurer{
    @Override
    public void addInterceptors(InterceptorRegistry registry) {
        registry.addInterceptor(new LoginInterceptor())
                .addPathPatterns("/**")  //所有请求都被拦截包括静态资源
                .excludePathPatterns("/","/login","/css/**","/fonts/**","/images/**",
                        "/js/**","/aa/**"); //放行的请求

}

/**    ------------------------------------------------------------------------- **/


// 自定义拦截器LoginInterceptor
/**
 * 登录检查
 * 1、配置好拦截器要拦截哪些请求
 * 2、把这些配置放在容器中
 */
@Slf4j
public class LoginInterceptor implements HandlerInterceptor {

    /**
     * 目标方法执行之前
     * @param request
     * @param response
     * @param handler
     * @return
     * @throws Exception
     */
    @Override
    public boolean preHandle(HttpServletRequest request, HttpServletResponse response, Object handler) throws Exception {

        String requestURI = request.getRequestURI();
        log.info("preHandle拦截的请求路径是{}",requestURI);

        //登录检查逻辑
        HttpSession session = request.getSession();

        Object loginUser = session.getAttribute("loginUser");

        if(loginUser != null){
            //放行
            return true;
        }

        //拦截住。未登录。跳转到登录页
        request.setAttribute("msg","请先登录");
//        re.sendRedirect("/");
        request.getRequestDispatcher("/").forward(request,response);
        return false;
    }

    /**
     * 目标方法执行完成以后
     * @param request
     * @param response
     * @param handler
     * @param modelAndView
     * @throws Exception
     */
    @Override
    public void postHandle(HttpServletRequest request, HttpServletResponse response, Object handler, ModelAndView modelAndView) throws Exception {
        log.info("postHandle执行{}",modelAndView);
    }

    /**
     * 页面渲染以后
     * @param request
     * @param response
     * @param handler
     * @param ex
     * @throws Exception
     */
    @Override
    public void afterCompletion(HttpServletRequest request, HttpServletResponse response, Object handler, Exception ex) throws Exception {
        log.info("afterCompletion执行异常{}",ex);
    }
}
Thymleaf引入
        <dependency>
            <groupId>org.springframework.boot</groupId>
            <artifactId>spring-boot-starter-thymeleaf</artifactId>
        </dependency>
文件上传
- 在application中设置最大上传体积 和 请求最大上传量
#server.error.path=/error
spring.servlet.multipart.max-file-size=10MB
spring.servlet.multipart.max-request-size=100MB- 使用:
/**
     * MultipartFile 自动封装上传过来的文件
     * @param email
     * @param username
     * @param headerImg
     * @param photos
     * @return
     */
    @PostMapping("/upload")
    public String upload(@RequestParam("email") String email,
                         @RequestParam("username") String username,
                         @RequestPart("headerImg") MultipartFile headerImg,
                         @RequestPart("photos") MultipartFile[] photos) throws IOException {

        log.info("上传的信息:email={},username={},headerImg={},photos={}",
                email,username,headerImg.getSize(),photos.length);

        if(!headerImg.isEmpty()){
            //保存到文件服务器,OSS服务器
            String originalFilename = headerImg.getOriginalFilename();
            headerImg.transferTo(new File("H:\\cache\\"+originalFilename));
        }

        if(photos.length > 0){
            for (MultipartFile photo : photos) {
                if(!photo.isEmpty()){
                    String originalFilename = photo.getOriginalFilename();
                    photo.transferTo(new File("H:\\cache\\"+originalFilename));
                }
            }
        }


        return "main";
    }
异常处理
如果遇到异常,Spring Boot会将错误转发/error处理所有错误的映射,并且以status为路径响应对应界面,error/下的4xx,5xx页面会被自动解析,
有专门的ErrorController处理/error为头的处理器
1. 异常出现,转发/error请求
1、执行目标方法,目标方法运行期间有任何异常都会被catch、而且标志当前请求结束;并且用 dispatchException
2、进入视图解析流程
processDispatchResult(processedRequest, response, mappedHandler, mv, dispatchException);
3、mv = processHandlerException;处理handler发生的异常,处理完成返回ModelAndView;
- 1、遍历所有的 handlerExceptionResolvers,看谁能处理当前异常【HandlerExceptionResolver处理器异常解析器】

- 1、DefaultErrorAttributes先来处理异常。把基本的异常信息保存到request域,并且返回值一定是返回null;
2、到
HandlerExceptionResolversComposite才开始判断哪个错误解析器适合处理,下列解析器只要有一个返回不是null,后面的解析器就都不会判断了- ExceptionHandlerExceptionResolver:寻找标记了
@ExceptionHandler的错误解析器 - ResponseStatusExceptionResolver:寻找标记了
@ResponseStatusException的错误解析器,此解析器返回的mv仍为null,但是会给请求加入statue码和错误信息reason - DefaultHandlerExceptionResolver:寻找框架底层的错误,比如类型转换错误
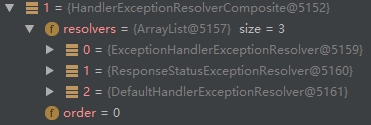
- ExceptionHandlerExceptionResolver:寻找标记了
- 当handlerExceptionResolvers也不能处理返回null时,最终异常会被抛出,Spring Boot会将错误转发
/error处理所有错误的映射
- 1、如果没有任何人能处理,最终servlet底层就会转发送 /error 请求。这个新的请求会被底层的BasicErrorController处理
- 2、Spring Boot会将错误转发
/error处理所有错误的映射
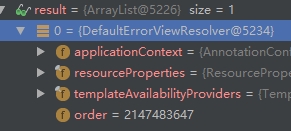
2.收到/error/{statue}后,BasicErrorController的处理
ModelAndView modelAndView = this.resolveErrorView(request, response, status, model);
内部默认调用DefaultErrorViewResolver这个解析器可以自己重新定义)
- ErrorViewResolver 实现自定义处理异常;
- response.sendError 。error请求就会转给controller
- 你的异常没有任何人能处理。tomcat底层 response.sendError。error请求就会转给controller
- basicErrorController 要去的页面地址是 ErrorViewResolver ;
3.定制错误处理逻辑
3.1 自定义错误页
- error/404.html error/5xx.html;有精确的错误状态码页面就匹配精确,没有就找 4xx.html;如果都没有就触发白页
3.2利用HandlerExceptionResolversComposite中自带的解析器
3.2.1 @ControllerAdvice + @ExceptionHandler处理全局异常;
底层是 ExceptionHandlerExceptionResolver 支持的,可以定义遇到 设定错误信息 时候的处理方法
/**
 * 处理整个web controller的异常
 */
@Slf4j
@ControllerAdvice
public class GlobalExceptionHandler {

    @ExceptionHandler({ArithmeticException.class,NullPointerException.class})  //处理异常
    public String handleArithException(Exception e){

        log.error("异常是:{}",e);
        return "login"; //视图地址
    }
}
3.3.2 @ResponseStatus + 自定义异常 ;
底层是 ResponseStatusExceptionResolver ,把responsestatus注解的信息底层调用 response.sendError(statusCode, resolvedReason)
,tomcat发送的/error
能够定义返回的状态码status和错误信息reson
先自定义一个RuntimeException
@ResponseStatus(value= HttpStatus.FORBIDDEN,reason = "用户数量太多")
public class UserTooManyException extends RuntimeException {

    public  UserTooManyException(){

    }
    public  UserTooManyException(String message){
        super(message);
    }
}
最后会让 handlerExceptionResolvers返回null,但是由于可以设定状态码status和错误信息reson,再次转发后发给BasicErrorController来处理
3.3.3 自定义一个HandlerExceptionResolver
可以利用@Order(value= Ordered.HIGHEST_PRECEDENCE)将自定义解析器提前,作为全局的错误解析器
@Order(value= Ordered.HIGHEST_PRECEDENCE)  //优先级,数字越小优先级越高
@Component
public class CustomerHandlerExceptionResolver implements HandlerExceptionResolver {
    @Override
    public ModelAndView resolveException(HttpServletRequest request,
                                         HttpServletResponse response,
                                         Object handler, Exception ex) {

        try {
            response.sendError(511,"我喜欢的错误");
        } catch (IOException e) {
            e.printStackTrace();
        }
        return new ModelAndView();
    }
}
Servlet组件注入
使用Servlet API
@ServletComponentScan(basePackages = "com.atguigu.admin") :扫描指定路径及其子目录下的servlet组件
它会自动扫描@WebServlet、@WebFilter和@WebListener
@ServletComponentScan(basePackages = "com.atguigu.admin")
@SpringBootApplication(exclude = RedisAutoConfiguration.class)
public class Boot05WebAdminApplication {

    public static void main(String[] args) {
        SpringApplication.run(Boot05WebAdminApplication.class, args);


  }


// 在com.atguigu.admin目录下的自定义原生的Servlet组件

@WebServlet(urlPatterns = "/my")
public class MyServlet extends HttpServlet {

    @Override
    protected void doGet(HttpServletRequest req, HttpServletResponse resp) throws ServletException, IOException {
        resp.getWriter().write("66666");
    }
}
@WebServlet(urlPatterns = "/my"):效果:直接响应没有经过Spring的拦截器
@WebFilter(urlPatterns={"/css/*","/images/*"})
@WebListener
2、使用RegistrationBean
ServletRegistrationBean
FilterRegistrationBean
ServletListenerRegistrationBean
自定义一个@Configuration
@Configuration(proxyBeanMethods = true)
public class MyRegistConfig {

    @Bean
    public ServletRegistrationBean myServlet(){
        MyServlet myServlet = new MyServlet();

        return new ServletRegistrationBean(myServlet,"/my","/my02");
    }


    @Bean
    public FilterRegistrationBean myFilter(){

        MyFilter myFilter = new MyFilter();
//        return new FilterRegistrationBean(myFilter,myServlet());
        FilterRegistrationBean filterRegistrationBean = new FilterRegistrationBean(myFilter);
        filterRegistrationBean.setUrlPatterns(Arrays.asList("/my","/css/*"));
        return filterRegistrationBean;
    }

    @Bean
    public ServletListenerRegistrationBean myListener(){
        MySwervletContextListener mySwervletContextListener = new MySwervletContextListener();
        return new ServletListenerRegistrationBean(mySwervletContextListener);
    }
}
嵌入式Servlet容器
springboot启动时,web应用会创建一个web的ioc容器ServletWebServerApplicationContext,ServletWebServerApplicationContext 容器启动寻找ServletWebServerFactory 并引导创建服务器
场景starter - xxxxAutoConfiguration - 导入xxx组件 - 绑定xxxProperties -- 绑定配置文件项
切换嵌入式Servlet容器
● 默认支持的webServer
○Tomcat, Jetty, or Undertow
○ServletWebServerApplicationContext 容器启动寻找ServletWebServerFactory 并引导创建服务器
●切换服务器
<dependency>
    <groupId>org.springframework.boot</groupId>
    <artifactId>spring-boot-starter-web</artifactId>
    <exclusions>
        <exclusion>
            <groupId>org.springframework.boot</groupId>
            <artifactId>spring-boot-starter-tomcat</artifactId>
        </exclusion>
    </exclusions>
</dependency>
定制Servlet容器
实现 WebServerFactoryCustomizer
- 把配置文件的值和ServletWebServerFactory 进行绑定
- 修改配置文件 server.xxx
- 直接自定义 ConfigurableServletWebServerFactory
xxxxxCustomizer:定制化器,可以改变xxxx的默认规则
import org.springframework.boot.web.server.WebServerFactoryCustomizer;
import org.springframework.boot.web.servlet.server.ConfigurableServletWebServerFactory;
import org.springframework.stereotype.Component;

@Component
public class CustomizationBean implements WebServerFactoryCustomizer<ConfigurableServletWebServerFactory> {

    @Override
    public void customize(ConfigurableServletWebServerFactory server) {
        server.setPort(9000);
    }

}
定制化的常见方式
- 修改配置文件;
- xxxxxCustomizer;
- 编写自定义的配置类 xxxConfiguration;+ @Bean替换、增加容器中默认组件;视图解析器
- Web应用 编写一个配置类实现 WebMvcConfigurer 即可定制化web功能;+ @Bean给容器中再扩展一些组件(最常用)
@Configuration
public class AdminWebConfig implements WebMvcConfigurer- @EnableWebMvc + WebMvcConfigurer —— @Bean 可以全面接管SpringMVC,所有规则全部自己重新配置; 实现定制和扩展功能
数据访问
配置
1.导入jdbc配置
        <dependency>
            <groupId>org.springframework.boot</groupId>
            <artifactId>spring-boot-starter-data-jdbc</artifactId>
        </dependency>
2.载入对应版本的sql驱动
默认版本:<mysql.version>8.0.22</mysql.version>

        <dependency>
            <groupId>mysql</groupId>
            <artifactId>mysql-connector-java</artifactId>
<!--            <version>5.1.49</version>-->
        </dependency>
想要修改版本
1、直接依赖引入具体版本(maven的就近依赖原则)
2、重新声明版本(maven的属性的就近优先原则)
    <properties>
        <java.version>1.8</java.version>
        <mysql.version>5.1.49</mysql.version>
    </properties>
3.修改配置项目
spring:
  datasource:
    url: jdbc:mysql://localhost:3306/db_account
    username: root
    password: 123456
    driver-class-name: com.mysql.jdbc.Driver
Stater使用
使用Druid数据源
druid官方github地址
https://github.com/alibaba/druid
1、引入druid-starter
        <dependency>
            <groupId>com.alibaba</groupId>
            <artifactId>druid-spring-boot-starter</artifactId>
            <version>1.1.17</version>
        </dependency>
2、配置实例
spring:
  datasource:
    url: jdbc:mysql://localhost:3306/db_account
    username: root
    password: 123456
    driver-class-name: com.mysql.jdbc.Driver

    druid:
      aop-patterns: com.atguigu.admin.*  #监控SpringBean
      filters: stat,wall,slf4j     # 底层开启功能,stat(sql监控),wall(防火墙)

      stat-view-servlet:   # 配置监控页功能
        enabled: true
        login-username: admin
        login-password: admin
        resetEnable: false

      web-stat-filter:  # 监控web
        enabled: true
        urlPattern: /*
        exclusions: '*.js,*.gif,*.jpg,*.png,*.css,*.ico,/druid/*'


      filter:
        stat:    # 对上面filters里面的stat的详细配置
          slow-sql-millis: 1000
          logSlowSql: true
          enabled: true
        wall:
          enabled: true
          config:
            drop-table-allow: false
使用Mybatis
配置模式
1、引入
        <dependency>
            <groupId>org.mybatis.spring.boot</groupId>
            <artifactId>mybatis-spring-boot-starter</artifactId>
            <version>2.1.4</version>
        </dependency>
2.1 、配置模式
配置文件
# 配置mybatis规则
mybatis:
 # config-location: classpath:mybatis/mybatis-config.xml  #全局配置文件位置,和下面configuration只能任选其一开启
  mapper-locations: classpath:mybatis/mapper/*.xml  #sql映射文件位置
  configuration:  # 指定mybatis全局配置文件中的相关配置项
map-underscore-to-camel-case: true #配置列名大小写驼峰识别接口Mapper.java使用@Mapper注解
然后写xxxxxMapper.xml文件,和原来的一样
注解+配置模式
- 简单sql语句,直接在Mapper接口处使用注解
@Mapper
public interface CityMapper {

    @Select("select * from city where id=#{id}")
    public City getById(Long id);

    public void insert(City city);

}
- 复杂语句仍然可以使用xml
<?xml version="1.0" encoding="UTF-8" ?>
<!DOCTYPE mapper
        PUBLIC "-//mybatis.org//DTD Mapper 3.0//EN"
        "http://mybatis.org/dtd/mybatis-3-mapper.dtd">
<mapper namespace="com.atguigu.admin.mapper.CityMapper">

<!--    public void insert(City city);-->
   <insert id="insert" useGeneratedKeys="true" keyProperty="id">
        insert into  city(`name`,`state`,`country`) values(#{name},#{state},#{country})
   </insert>

</mapper>
复杂注解
- 复杂的注解也可以使用
@Options
    @Insert("insert into  city(`name`,`state`,`country`) values(#{name},#{state},#{country})")
    @Options(useGeneratedKeys = true,keyProperty = "id")
    public void insert(City city);
Mybatis-plus
https://github.com/baomidou/mybatis-plus
建议idea先安装 MybatisX 插件
1、引入
        <dependency>
            <groupId>com.baomidou</groupId>
            <artifactId>mybatis-plus-boot-starter</artifactId>
            <version>3.4.1</version>
        </dependency>
默认行为:
- mapperLocations:有默认值。
classpath*:/mapper/**/*.xml;任意包的类路径下的所有mapper文件夹下任意路径下的所有xml都是sql映射文件 - @Mapper 标注的接口也会被自动扫描;建议直接 @MapperScan("com.atguigu.admin.mapper") 批量扫描
使用:
Mapper
Mapper继承 BaseMapper 就可以拥有crud能力
public interface UserMapper extends BaseMapper<User> {


}
Service
Service接口继承IService<User>,实现类继承ServiceImpl<UserMapper,User>就可以自动实现一些内置的Service方法
@Service
public class UserServiceImpl extends ServiceImpl<UserMapper,User> implements UserService {


}

public interface UserService extends IService<User> {

}
可以直接在controller中使用
    @Autowired
    UserService userService;

@GetMapping("/dynamic_table")
    public String dynamic_table(@RequestParam(value="pn",defaultValue = "1") Integer pn,Model model){

        //从数据库中查出user表中的用户进行展示
        List<User> list user = userService.list();

        //构造分页参数
        Page<User> page = new Page<>(pn, 2);
        //调用page进行分页
        Page<User> userPage = userService.page(page, null);


        model.addAttribute("users",userPage);

        return "table/dynamic_table";
    }
使用插件
https://baomidou.com/pages/2976a3/#mybatisplusinterceptor
使用InnerInterceptor接口来实现,下面以自动分页: PaginationInnerInterceptor为例子
@Configuration
public class MyBatisConfig {


    /**
     * MybatisPlusInterceptor
     * @return
     */
    @Bean
    public MybatisPlusInterceptor paginationInterceptor() {
        MybatisPlusInterceptor mybatisPlusInterceptor = new MybatisPlusInterceptor();
        // 设置请求的页面大于最大页后操作, true调回到首页,false 继续请求  默认false
        // paginationInterceptor.setOverflow(false);
        // 设置最大单页限制数量,默认 500 条,-1 不受限制
        // paginationInterceptor.setLimit(500);
        // 开启 count 的 join 优化,只针对部分 left join

        //这是分页拦截器
        PaginationInnerInterceptor paginationInnerInterceptor = new PaginationInnerInterceptor();
        paginationInnerInterceptor.setOverflow(true);
        paginationInnerInterceptor.setMaxLimit(500L);
        mybatisPlusInterceptor.addInnerInterceptor(paginationInnerInterceptor);

        return mybatisPlusInterceptor;
    }
}
Redis
1、配置
        <dependency>
            <groupId>org.springframework.boot</groupId>
            <artifactId>spring-boot-starter-data-redis</artifactId>
        </dependency>
spring:
redis:
host: r-bp1nc7reqesxisgxpipd.redis.rds.aliyuncs.com
port: 6379
password: lfy:Lfy123456
client-type: jedis
jedis:
pool:
max-active: 102、RedisTemplate与Lettuce
   @Autowired
    StringRedisTemplate redisTemplate;

    @Test
    void testRedis(){
        ValueOperations<String, String> operations = redisTemplate.opsForValue();

        operations.set("hello","world");

        String hello = operations.get("hello");
        System.out.println(hello);
    }
Junit5
junit5变成了JUnit 5 = JUnit Platform + JUnit Jupiter + JUnit Vintage
使用JUnit5的注解与JUnit4的注解有所变化
https://junit.org/junit5/docs/current/user-guide/#writing-tests-annotations
@SpringBootTest
class Boot05WebAdminApplicationTests {


    @Test
    void contextLoads() {

    }
}
Profile环境配置功能
1、application-profile功能
- 默认配置文件 application.yaml;任何时候都会加载
- 指定环境配置文件 application-{env}.yaml
激活指定环境
- 配置文件激活
spring.profiles.active=myprod命令行激活:java -jar xxx.jar --spring.profiles.active=prod --person.name=haha
- 修改配置文件的任意值,命令行优先
- 默认配置与环境配置同时生效
- 同名配置项,profile配置优先
2、@Profile条件装配,在指定环境下才生效
@Configuration(proxyBeanMethods = false)
@Profile("prod")
public class ProductionConfiguration {

    // ...

}多种场景情况下:@Profile(value={"prod","default"})
profile分组
spring.profiles.group.production[0]=proddb
spring.profiles.group.production[1]=prodmq

使用:--spring.profiles.active=production  激活
外部化配置
常用:Java属性文件、YAML文件、环境变量、命令行参数;
1、配置文件查找位置
(1) classpath 根路径(resource目录下)
(2) classpath 根路径下config目录
(3) jar包当前目录
(4) jar包当前目录的config目录
(5) /config子目录的直接子目录(限定Linux?)
越靠下面优先级越高
starter启动原理
一个工程中一般有以下两个包
(这是第三方的格式)
- atguigu-hello-spring-boot-starter(启动器)
- atguigu-hello-spring-boot-starter-autoconfigure(自动配置包)
Spring会先在autoconfigure下的/META-INF/spring.factories下搜寻自动加载的类
# Auto Configure
org.springframework.boot.autoconfigure.EnableAutoConfiguration=\
com.atguigu.hello.auto.HelloServiceAutoConfiguration
@Configuration
@EnableConfigurationProperties(HelloProperties.class) //默认HelloProperties放在容器中
public class HelloServiceAutoConfiguration{
@ConditionalOnMissingBean(HelloService.class)
@Bean
public HelloService helloService(){
HelloService helloService = new HelloService();
return helloService;
}
}启动时将其加入容器中
杂项
String[] str = Sting.split([regix字符])通过,分割字符关于RequestMappingHandlerAdapter中的argumentResolvers和returnValHandlrs:
- argumentResolvers :支持接收的参数类型
- returnValHandlrs:支持返回的参数类型
- 匹配所有资源:spring为
/**,servlet为/* DispatcherServlet是通过springboot中的org.springframework.boot.autoconfigure.web.servlet.DispatcherServletAutoConfiguration自动配置的,默认映射
/Mybatis的驼峰大小写识别:
- 数据库中列名:
user_id - mapper映射到pojo中变量名:
userId
- 数据库中列名:
thymeleaf:
th:each = "num:${#numbers.sequence(1,pages)}" // 页数显示- RedirectAttributes:用于给
redirect:/index请求后添加参数 - 包内类的名字为xxxxTemplate的一般就为操作类,使用的时候导入这个类即可